Sewing the Sleeves for the Mauve Italian Gamurra

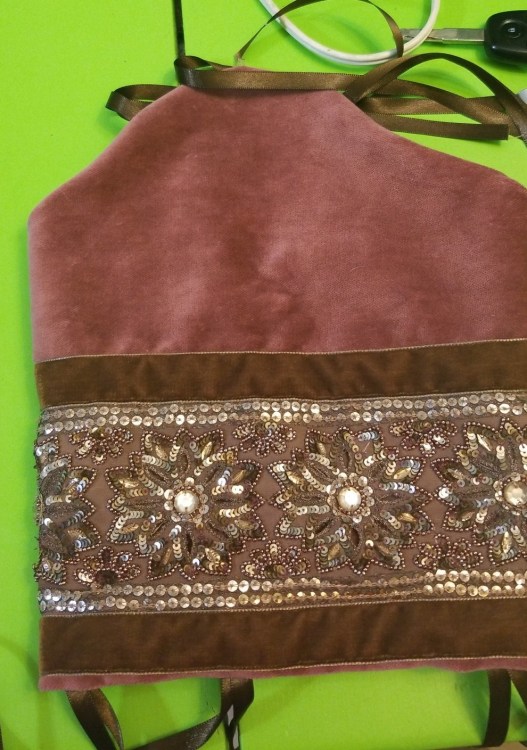
The sleeves are assembled in two pieces per side–the upper and lower sleeves. I started with the upper sleeves. The upper sleeve was going to have a trim pattern echoing the bodice, the sari trim bordered on top and bottom by the wide dark brown velvet ribbon. I started by marking a line at 1.25 inches to run the reclaimed beaded sari border at. This measurement would allow for my thick brown velvet ribbon to be attached and a thin stripe of the cotton velvet to show below the velvet trim on the completed sleeve. The top edge was the side with the sari and had to have the excess sari folded under before being sewn down.


Once I had the beaded trim down, I added the thick dark brown velvet ribbon above and below the sari trim.


Next I attached it to the lining of cotton broad clothe. Prior to doing so I cut my 20 inch long ribbons and placed them, folded in half, on the curve of the shoulder and at the edge above the elbow. I pinned these down and pinned the ends in the middle of the sleeve so that the ends would not get sewn into the seams. I sewed rights to rights around the entire edge except for a four inch gap on one of the sides. I then clipped my corners and clipped/notched my curves and turned the sleeve, right sides out. I then sewed up the gap I turned the sleeve through about 1/16th of an inch from the edge of the fabric. Finally, from the cotton lining side I whip stitched the ends together.
The finished upper sleeves looked like this.


Once I had the upper sleeve done, I moved onto the lower sleeve. The lower sleeve was going to have trim that echoed the trim motif from the skirt of the gamurra. I was going to do the thick dark brown ribbon, a .75 inch gap, the thin light brown trim, a .75 inch gap, and then the thin dark brown trim. I started by marking a line at 1 inch from the wrist edge of the sleeve and then sewing the first line of trim on.


I then marked .75 inches above the thick brown velvet ribbon and attached the thin light brown ribbon.


I then marked .75 inches above the think light brown velvet ribbon and attached the thin dark brown ribbon.


Next I attached it to the lining of cotton broad clothe. Prior to doing so I cut my 20 inch long ribbons and placed them, folded in half, at the edge below the elbow. I pinned these down and pinned the ends in the middle of the sleeve so that the ends would not get sewn into the seams. I again sewed rights to rights around the entire edge except for my four inch gap on one of the sides. I clipped my corners and clipped/notched my curves. Then I turned the sleeve, right sides out. At about 1/16th of an inch from the edge of the fabric, I sewed up the gap I turned the sleeve through.


Finally, from the cotton lining side I whip stitched the ends together.


Normally the sleeve would be worn over my honeycomb smocked camica and the white fabric would show at shoulder and elbow. However, the finished product sans camica looks like this.


Recent Comments